TEM sample preparation techniques
Visualizing a biological specimen with an electron microscope is not a trivial task, mostly because of the intrinsic nature of the electron and matter interactions that are responsible for the image formation. In order to be imaged using TEM, the specimen has to be very thin and placed inside high vacuum. Thus, biological specimens cannot be imaged in their native state and need to be heavily processed. Accordingly, sample preparation is a crucial step, which represents an essential activity and service in our facility.
A conventional protocol to prepare samples for ultrastructure imaging involves the following steps.
- Primary fixation with aldehydes (proteins)
During this step proteins and, to a lesser extent, other cell molecules, become crosslinked by formaldehyde and/or glutaraldehyde molecules. Small mammals can be fixed by perfusion, whereby the fixative is introduced via the vascular system. Other samples need to be fixed by immersion and the specimen needs to be dissected no thicker than 1 mm in at least one direction. -
Secondary fixation with osmium tetroxide (lipids)
This step ensures that lipids, for example the phospholipids forming membranes, are preserved and are not extracted during dehydration. During the fixation a black insoluble precipitate is formed on the membranes, creating membrane contrast. -
Tertiary fixation and contrasting with uranyl acetate
Uranyl acetate is a heavy metal salt which binds to proteins, lipids and nucleic acids, providing additional contrast. Some authors believe it also has fixative properties. Samples can be incubated en bloc in a solution of uranyl acetate before dehydration but the stain can also be applied to the sectioned specimen before lead staining. -
Dehydration series with solvent (ethanol or acetone)
A fixed specimen is dehydrated by incubation in a series of ethanol or acetone solutions. Solvent concentration is increased gradually so that water is removed gently, without causing artefacts, mainly shrinkage. -
Resin infiltration and embedding
Following dehydration, the solvent is replaced with a gradually increasing concentration of liquid resin (typically epoxy resin for ultrastructure studies). The specimen is placed in a mold filled with liquid resin and cured into a hard block using heat or UV light. After this, a sample can be stored indefinitely. -
Sectioning and mounting sections on specimen grids
A specimen embedded in hardened resin can be sectioned extremely thinly, at less than 100 µm. This allows for the electron beam to pass from the electron gun through the specimen to the detector. The sections are mounted on specimen grids which fit into microscope sample holder. -
Contrasting (poststaining)
Biological specimens are naturally not very electron opaque as they are composed of atoms with low atomic numbers and the beam passes through them easily. To increased ample contrast, the sections can be post-stained with lead citrate. This heavy metal salt, similarly to osmium tetroxide and uranyl acetate, binds to cell components and scatters the incident beam electrons. The areas of specimen section which scatter electrons more are recorded as darker pixels, which stand out against the brighter background.
While the whole process can take up to several days when performed manually, it can be shortend to a couple of hours in the automated microwave-assisted processor Leica EM AMW. Microwave processing often results in reduced artefact occurrence.

High pressure freezing and freeze substitution
Chemical fixation introduces a number of artifacts due to factors such as slow diffusion, selective reactions between fixatives and cell components and osmolarity differences between fixative and specimen. Subsequently, proteins can cluster together as a result of crosslinking, membranes become “wobbly” and antigenicity is affected. To avoid or substantially minimize the occurrence of these artifacts, a sample can be vitrified in liquid nitrogen and under very high pressure (over 2000 bar) instead of being fixed chemically. This results in instant and simultaneous immobilization of all cell components without ice crystal formation and cell component disruption (Fig. 1).
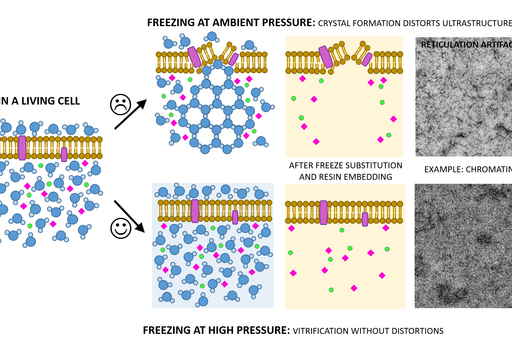
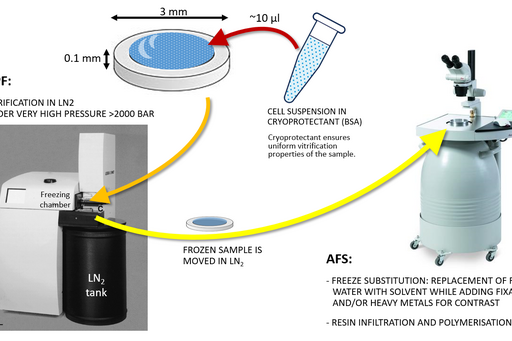
Sample size for high pressure freezing is limited as vitrification is effective only to the depth of 200 µm. Therefore a very small and thin piece of tissue or a very small volume (several microlitres) of cell suspension is required. A solution of cryoprotectant, most commonly an animal serum albumin, is used to surround the sample during the freezing to prevent drying out and ice crystal formation and optimise heat transfer.
Following the freezing, vitrified water is removed with solvent containing one or a combination of the following components to increase contrast and additionally fix the specimen: a heavy metal stain (most commonly uranyl acetate), formaldehyde, glutaraldehyde, osmium tetroxide, tannic acid. This process is known as free substitution (Fig. 2). The solvent is finally replaced with liquid resin and cured at sub-zero temperature using UV light to avoid heat damage to epitopes.
Tokuyasu technique
A Tokuyasu workflow consists of the following steps:
- Aldehyde fixation
- Infiltration in sucrose (cryoprotectant)
- Immersion-freezing in liquid nitrogen at ambient pressure
- Cryo sectioning, picking up of sections in a methylcellulose-sucrose mix, thawing and mounting on the specimen grid
- Removal of methylcellulose-sucrose mix by melting and rinsing away with liquid gelatin
- Immunolabeling
- Poststaining with a protective layer of methylcellulose-uranyl acetate
It is typical for Tokuyasu sections to have areas with negative membrane contrast, i.e. the membranes appear bright against dark background as opposed to conventional preps where membrane contrast is positive. It is also common for the section to display compression artifacts as well as knife scratches. However, this technique can in many cases offer superior labelling quality and it lends itself well to multiple labelling, whereby different antibodies tagged with different size gold particles are applied to th
Chemical fixation and acrylic resin embedding
Certain epitopes, for example many plant cell wall carbohydrates as well as some proteins, retain their antigenicity after gentle chemical fixation with aldehydes, i.e. using mainly formaldehyde and none or very little glutaraldehyde. They can then be prepared in a similar manner to a standard ultrastructure preparation but the osmication step is typically skipped and an acrylic resin is used instead of epoxy resin as its hydrophilic properties allow easier penetration of antibodies. Additionally, dehydration can be carried out in a free substitution machine (hyperlink to HPF/AFS prep) in which the temperature is graually lowered from 4°C to ‑25°C to minimise extraction of cell content by the solvent and resin. This technique is called progressive lowering of temperature (PLT). The resin can be polymerised using UV light instead of heat to prevent any further loss of antigenicity.

Negative staining
Negative staining is a rapid method for screening the morphology, size and arrangement of particulate samples such as proteins, vesicles, isolated organelles, whole viruses as well as bacterial flagellae and pili. This technique requires very little specialized equipment and sample suspension can be mounted directly on TEM support grids and examined after air-drying. However, due to their small size and low atomic numbers of the constituent atoms, the particles are relatively electron-lucent, i.e. they do not cause considerable electron scattering when they interact with the TEM beam. This means that they have very low contrast and do not stand out from the background.
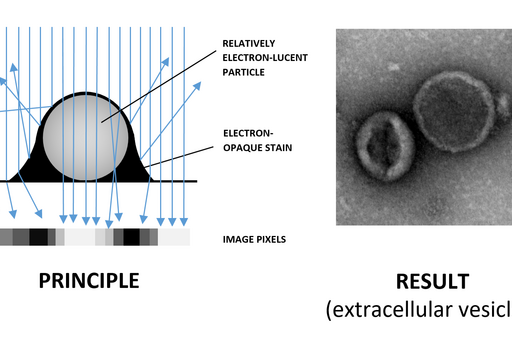
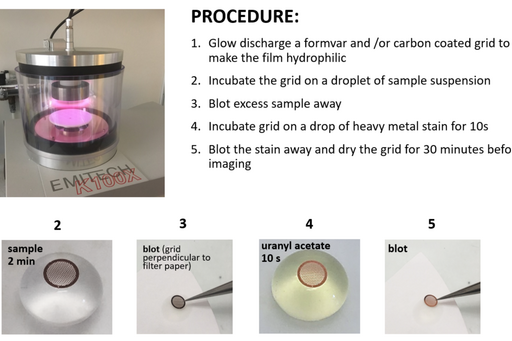
In order to visualize particulate samples a heavy metal stain such as uranyl acetate or phosphotungstic acid is used. The particles are surrounded by the stain, which scatters electrons strongly creating negative contrast, whereby the particle appears bright against the stain (Fig. 1). This is the opposite of the stain binding to the sample and excess being removed, in which case a particle appears dark against bright background (positive staining). Parametres such as staining time and blotting angle (Fig. 2) affect the proportions between negative and positive staining on the grid and may have to be optimized for each sample type.
Electron 3D tomography
Three-dimensional information is necessary for a good understaning of structure-function relationships in a biological specimen. A classical TEM image provides a 2D projection of the bulk of information contained in a 70 nm specimen section. Therefore the section thickness constitutes a resolution limit. In contrast to this, electron tomography allows acquisition of a number of images from one sample section at incremental angles and reconstruction of organelles in 3D (Fig. 1). After processing and reconstruction, the final resolution is much better than the 70 nm limit of a traditional TEM section (5-20 nm).
Sample preparation follows the standard protocol. However, a thicker section of typically 200-300 nm is cut to provide more volume. Information from several serial sections can also be combined (serial tomography).
Cryogen Electron Microscopy
Our Talos L120C with LaB6 filament and Ceta camera is suited for screening of single particle samples in cryo modality. Gatan 626.6 single specimen cryo-holder allows the user to screen approximately 4 grids per day, with a 40 minute holder warmup cycle between each grid. The user can choose to use the low dose interface of the microscope software or EPU.
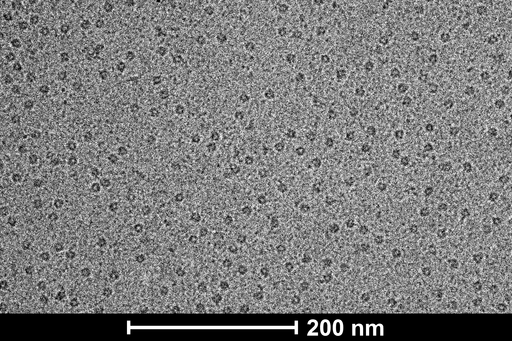
Purified samples are vitrified by plunging them in liquid ethane cooled by liquid nitrogen. Despite the liquid nitrogen being colder than liquid ethane (‐196°C and ‐182°C respectively) liquid ethane has higher heat transfer capacity and results in better vitrification. The CCI EM preparation lab is equipped with ThermoFisher Vitrobot Mark IV plunge-freezing system.
